Git rebase like a pro
I felt a lot like I was fumbling in the dark when using git for the first year or so. Tools like learngitbranching were great for getting me going, but I often felt like I didn’t have as much control over my commits and the history as I would like. And when working in a team, merge conflicts become quite common. The race to be the first to merge the PR so you don’t have to deal with the conflict becomes quite heated.
I used to get upset whenever I had to resolve a merge conflict because it would take ages to work out what I would have to fix.
Or if I realised that I’d made a mistake about 10 commits ago and don’t want anyone to know.
And sometimes you want to develop on someone else’s feature branch rather than off main.
What do you do when the feature branch you’ve been working on gets merged?
Learning about interactive rebases felt (and still feels like) a super power.
Note however that rebasing can cause a bit of pain if you’re working with people less familiar with git. But hopefully with these few commands and explanations you’ll be git rebasing like a pro in no time!
The most important step
The most important step before doing a rebase you’re not 100% sure will work fine is put down a temporary branch to jump back to. I’ll repeat that in big so that people skipping through this spot it
Put down a temporary branch before a big rebase
Just doing git branch tmp/before-rebasing before you rebase will save you a big headache if you do something horribly wrong.
Yes there are always ways back, but if git decides to garbage collect your commit before you notice you’ll be in a difficult space with potential losses of work.
So, now that you’ve done that, I’ll continue this article.
Contents
This article is quite long, and the subsections and sub-subsections I’ve used for some reason make this a little difficult to navigate. So here are some quick links if you know what you want to do:
2 My branch’s history makes no sense
3 Someone rebased a branch I was looking at locally
4 I branched of someone else’s branch, now that’s merged and I want my branch off main
What does a rebase actually do?
A rebase is a kind of ‘history rewriting’ command. In essence, it lets you take a group of commits, and apply them to on top of a different commit.
But, as I will show in some of the examples below, it lets you do all sorts of other operations too.
Note I will always run a so called interactive rebase.
This causes git to show you what it plans to do, and gives you a chance to change your mind, cancel the rebase etc.
I think the easiest way to show what a rebase does and why you’d use it is to give some examples of when it is useful and how to use it.
1 My PR has a merge conflict
This is probably the easiest and most common time that I would rebase in my day-to-day work. It is also where I would recommend people get their feet wet and practice before moving on to some of the more advanced use cases below.
I’m going to assume your PR is against a branch named main and that the remote location is called origin.
Both of these can be swapped for any branches (note that you’ll need to refer to a later section if the branch your PR is against has itself been rebased).
You are currently working on the branch feature in this example of what we’re going to do, and suppose that there is a merge conflict.
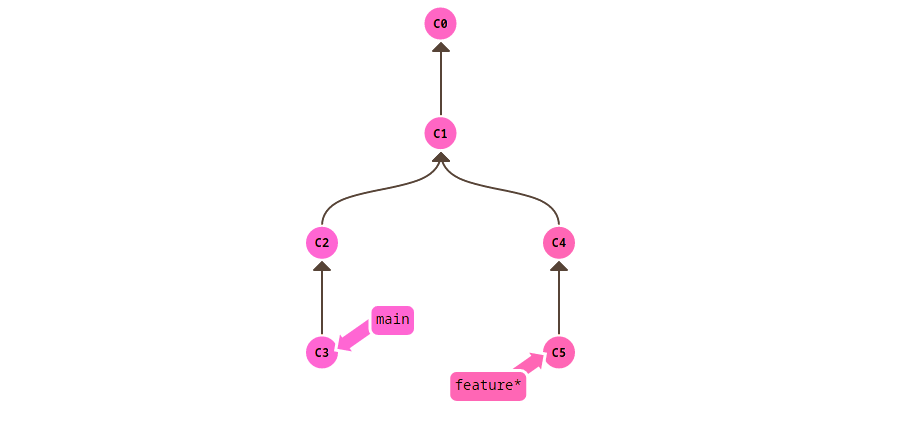
Normally the way I see people do this is by first merging main into their own branch, and then later merging their branch into main.
I argue that this is ugly and also less useful:
- It is harder for you because you have to fix every single merge conflict at the same time. What I mean by that is if you have multiple files conflicting, you have to fix them all. And this can get pretty complex if you have made some deep refactor.
- It is harder for the reviewer because you could change anything in that merge commit, and it can be very difficult to follow that commit specifically.
- Also, looking commit-by-commit at the resulting code requires knowledge of how the system used to be rather than how it is currently.
- And finally, aesthetically it makes the code graph look really ugly.
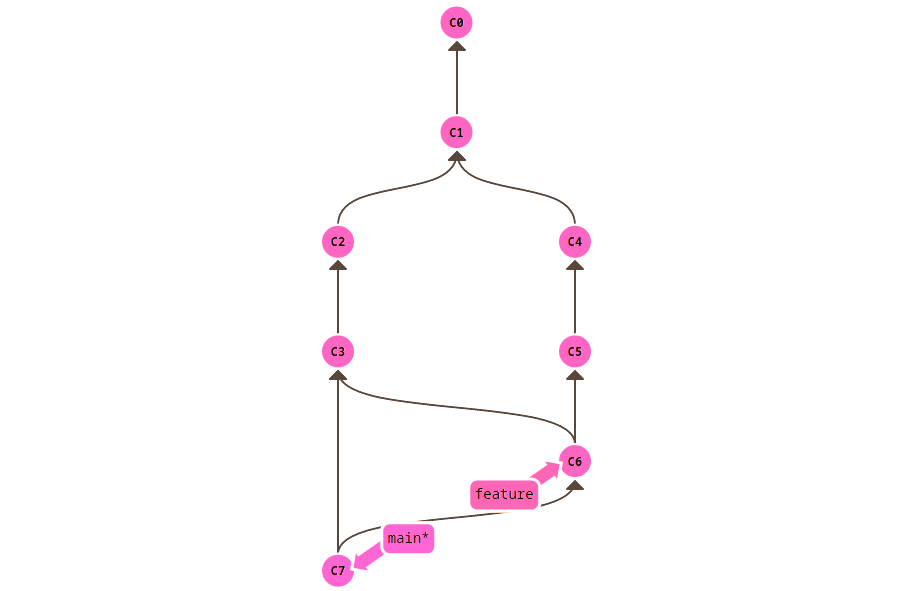
This is what your history will end up looking like with the git merge strategy mentioned above
And this with git rebase
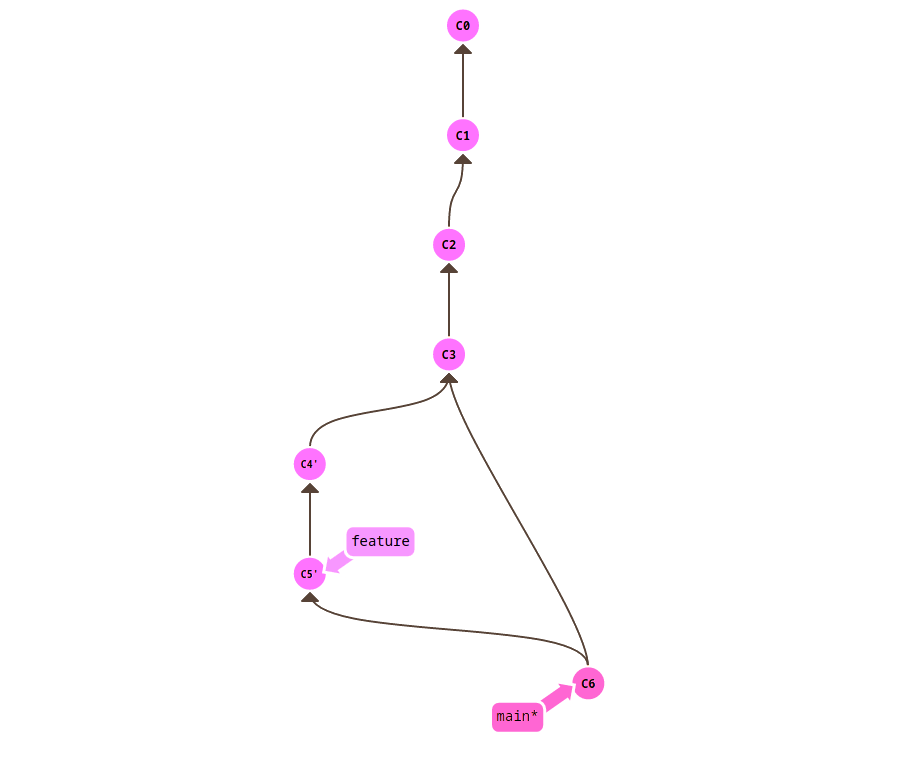
Please forgive the strange arrow directions here, not sure what’s going on with the visualiser…
1.1 Put down a temporary branch
Okay, I’ll admit that in this case I would normally not. But if this is the first time you’re doing a git rebase, please do it.
$ git branch tmp/before-rebasing
Remember that git branch creates a branch pointing to your current commit, but doesn’t switch to it.
You can go back to this if something goes horribly wrong in the next step.
1.2 Start the interactive rebase
This is the magic of rebasing. I will always rebase interactively. If only to know exactly what git is going to do once it starts.
Firstly, ensure your local pointer to the origin/main is up to date with
$ git fetch
Then, do the rebase
$ git rebase -i origin/main
This will open your currently configured text editor (controlled by the EDITOR environment variable if you want to change it), showing you the list of commits it will replay.
If you’re happy with the list, then save and close the file and git will get to work reapplying your commits one at a time.
1.3 Merge conflict!
You’re doing this to resolve a merge conflict, so you will get one eventually. At this point you have to do something you may not be entirely familiar with. Look at the commit you’re in at the moment. This will be important.
The current state of your files will be as-if you’ve done the commits up to this point on top of main rather than your historical version that you actually did the work in.
So when you fix the merge conflict, you have to leave those files in the state you would’ve had it in at this point in your branch (not the end result) had main looked like it does now.
This is because after you’ve fixed this conflict, the rebase will continue to run the remaining commits.
Once you’re happy with the changes, you can git add the files you’ve updated to tell git you’ve fixed the conflict.
And then run
$ git rebase --continue
to continue the rebase.
Once that’s all done, push your branch up to origin with
$ git push --force-with-lease
and you’re good to go.
1.4 Help, something went wrong!
It happens sometimes. How to fix it depends on at what point you’re at for your rebase.
1.4.1 The rebase totally failed but it claims to have finished
Good thing you put a temporary branch down at the start. Simply resetting your git branch to that temporary place will fix the issue.
$ git reset --hard tmp/before-rebase
If you were a terrible person and didn’t put a temporary branch down, all is not lost (but it is definitely slightly harder). Provided you haven’t pushed your changes yet, you can jump to the old location according to where it is in origin, with
$ git reset --hard origin/feature
If you’ve pushed, you may be able to get an old commit hash for the end of your old feature branch from somewhere, and then you can do
$ git reset --hard <commit hash>
And if you’ve done none of those things, take this as a lesson to read the text in big writing. Or look up the git reflog and have a go at working with that.
1.4.2 The rebase is still in progress but I don’t want to do it any more
This is a nice easy fix.
$ git rebase --abort
will take you back to where you started.
1.4.3 I thought I wanted this commit, but I don’t really
Running
$ git rebase --skip
allows you to completely skip this commit and continue with the next ones. This comes up occasionally when you fix a bug in some existing code because your new feature is exercising it but someone beat you to the fix. Then it makes no sense to keep this commit, so skip it.
2 My branch’s history makes no sense
This is probably my favourite usage of git rebasing. Not only is it super useful in making the reviewer’s job easier, but it also hides your silly mistakes which will make you look like a l33t haxxor.
I do this if I want to
- Change a commit message for a commit a little bit back in the history
- Split some commits into more pieces
- Combine multiple commits into one
- Reorder some commits to makes more sense to a reviewer
- Pretend I wrote the tests first
2.1 Put down a temporary branch
You bored of me saying this already? I’ve had more complaints about people not doing this step then anything else with git rebasing. So hopefully this’ll stop that
Something along the lines of the following will save you.
$ git branch tmp/before-rebasing
2.2 Start the interactive rebase
In this case, we’re not going to be rebasing to the tip of main (although you could decide to do that if you want).
So here we will instead find the commit hash of the oldest commit in your branch.
I like to find it using git log and scrolling back but you can do this any way you want.
Lets say my commit hash is deadbeef, use the command
git rebase -i deadbeef
and this time we’re actually going to change the contents of the file a little.
You’ll see something along the lines of this in the file.
# Commands:
# p, pick <commit> = use commit
# r, reword <commit> = use commit, but edit the commit message
# e, edit <commit> = use commit, but stop for amending
# s, squash <commit> = use commit, but meld into previous commit
# f, fixup <commit> = like "squash", but discard this commit's log message
# x, exec <command> = run command (the rest of the line) using shell
# b, break = stop here (continue rebase later with 'git rebase --continue')
# d, drop <commit> = remove commit
# l, label <label> = label current HEAD with a name
# t, reset <label> = reset HEAD to a label
# m, merge [-C <commit> | -c <commit>] <label> [# <oneline>]
# .       create a merge commit using the original merge commit's
# .       message (or the oneline, if no original merge commit was
# .       specified). Use -c <commit> to reword the commit message.
#
# These lines can be re-ordered; they are executed from top to bottom.
#
# If you remove a line here THAT COMMIT WILL BE LOST.
#
# However, if you remove everything, the rebase will be aborted.
#
# Note that empty commits are commented out
Pretty much the rest of this section will be what these do, ordered from most useful to least.
2.2.1 pick
You’ll see a lot of these by default. One for every commit hash in your branch. Reorder them in any order, and importantly remove any for commits you don’t want any more.
2.2.2 fixup
If you did a commit, and then the next commit is just fixing a typo in something in the previous commit (or you have a commit that fixes a typo in a commit some time in the past), you can follow up your old commit with this fixup.
As an example, suppose it looked something like this
pick deadbeef1 Add an article about the C preprocessor
pick deadbeef2 Add an article about PAL video processing
pick deadbeef3 Fix typo in C preprocessor article
Change the file to the following before rebasing and the end result is your commit adding the article about the C preprocessor will also contain the typo fix.
pick deadbeef1 Add an article about the C preprocessor
fixup deadbeef3 Fix typo in C preprocessor article
pick deadbeef2 Add an article about PAL video processing
The difference between fixup and squash is that squash awkwardly adds the commit message of the squashed commit to the commit message of the commit it is being squashed into.
So I use fixup much more often then squash.
2.2.3 edit
Maybe you want to edit an entire commit.
This is super useful if you accidentally commit something you didn’t mean to.
For example, maybe you stuck a debugger statement in a js file somewhere while you were developing it and accidentally committed it.
Putting edit before that commit will allow you to remove the debugger line once git gets to that point in the rebase.
There is something very important to do here though (and a lot of people get this wrong the first time).
Once you’ve fixed up that commit, git add the files you’ve modified and then run git rebase --continue.
DO NOT COMMIT THE CHANGES.
The git rebase --continue will do the commit with the old commit message for you.
2.2.4 Removing the line entirely
If you don’t want the commit any more, just don’t include the line with that commit in the rebase command list. Then when git does the rebase, that commit won’t be included.
2.3 After rebasing
Once you’re done, if you have already pushed your branch you’ll have to force push it to origin like the merge conflict example above.
$ git push --force-with-lease
And now it looks like you never make any mistakes. I’m sure your colleagues will be incredibly impressed.
2.4 Help, something went wrong!
The same advice applies as from the previous section
3 Someone rebased a branch I was looking at locally
This can be annoying if you’ve not seen it before.
You run git pull and you get some strange errors or it is telling you it needs to commit something.
If you have done some of your own work on this branch too, then put down a temporary branch first, and then after this do step 4 on that temporary branch.
Afterwards, git fetch to update your local copy and then git reset --hard origin/branchname gets you back in place.
4 I branched of someone else’s branch, now that’s merged and I want my branch off main
This is a long title, but I couldn’t come up with a more descriptive name. This works very similarly to problem #1 but with a slight modification.
Just running git rebase origin/main will cause the rebase to pick up not only your changes but also all of the changes in the branch you branched off.
And git really doesn’t like applying a diff twice.
Firstly, put down a temporary branch to go back to in case things go horribly wrong with git branch tmp/before-rebase.
So, you need to find the point at which you branched off (for example by using git log or similar), and then run
$ git rebase -i <commit hash> --onto=origin/main
At this point, everything will go ahead like in #1. And of course you could also apply the steps in #2 to change what your branch history looks like.
Conclusion
Hopefully with these tips you’ll be rebasing like a pro. This was a difficult article to write because I wasn’t sure how to organise it. However, hopefully once you’ve mastered these techniques, you’ll really understand not only the power of git, but also how helpful having a clean history in your project is.